Showing posts with label tips. Show all posts

How To Update Your iPhone and iPad to iOS 10


iOS 10 is here! Here is how to update your device and get all those new features! 

The first things you'll want to do before updating your iPhone or iPad is to back it up! Why risk losing your data?! Things do sometimes go wrong and you may need to restore your iDevice from a backup. So... BACKUP FIRST!

If you have an iCloud backup that backs up everything, that's great, but if do you have a PC or Mac, I'd still strongly recommend backing up your device in iTunes.

Now, if you've never connected your device to iTunes before, check out this link to the Apple guide on backing up your device, first.

To backup your device and then update to the latest version of iOS, simply:


1. Plug your iPhone or iPad into your computer, then open the iTunes application.


2. Select your iPhone or iPad when it appears in iTunes.

If you want to backup your Health and Activity data, you will need to encrypt your backup.


3. Then, simply click, "Back Up Now" and wait for the backup to complete.

4. Next, you could update your device in iTunes by clicking "Check For Update", or you can eject your device and perform the update over the air!

On your iPhone or iPad, open the 'Setting' app.


Then tap 'General'.


Then 'Software Update', and follow the prompts.


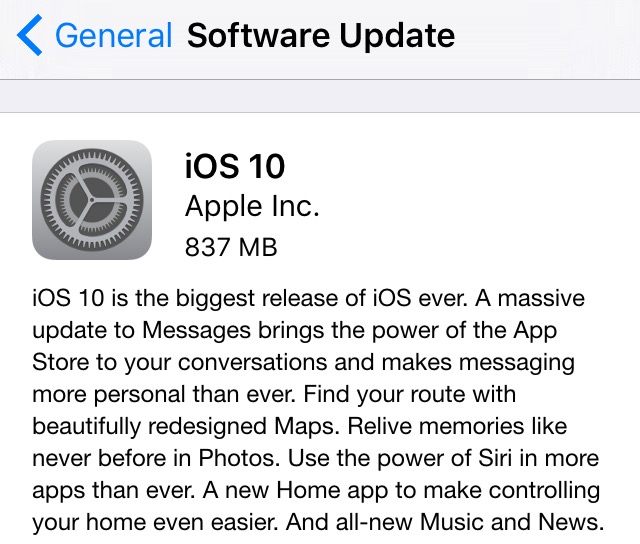
Your device will download the update, then begin to install. Wait for it to complete and then you are all set and will be running the latest version of iOS!


How To Remove A Follower on Instagram Without Blocking Them


There are sometimes when you just don't want someone to follow you on Instagram anymore. Maybe you've outgrown your friendship with them, maybe you had a fight, maybe it's an ex-partner, or maybe you never liked them and only let them follow you out of feeling like you had too. Whatever the reason, you just don't want them to see your photos and videos anymore, but you don't really want to block them. You just don't want them to follow you. So how do you do this? Instagram doesn't have a 'force this person to unfollow me' button... Never fear! There is a trick you can do. And after you've done this, it'd almost seem like they unfollowed you!

Okay, so the title is a little misleading and that is because you have to block them. But wait! Don't hit that back button yet! Hear me out! The trick is still coming! Okay, ready for it? Just simply block the person and then unblock them. Whaaaat! Let me explain if you don't get it yet.

When you block someone on Instagram, they'll no longer be able to see your feed or search for your name. But they can still find you either on the desktop Instagram website, if they know your username, or on a mutual friends profile. But, even if they did, they won't be able to re-follow you. Now, if you think this is a little extreme, just unblock them after blocking them. It'll still cause the following connection between you two to break, but they will still afterwards be able to search for you on Instagram. It'll just appear as if they no longer follow you. Now, of course this means that they can try re-adding you again, if they don't 'get the message'. And they might question why all of a sudden 'they stopped' following you. So... maybe it's still best just to leave them blocked.

Now, in case you've never blocked anyone on Instagram before (lucky you), here's how to do so:

Step 1. Open the Instagram app. Obviously.

Step 2. Find and view their Profile Page. You can either search for their name, go through your follower list, likes on a photo, etc...

Step 3. In the top right hand corner, tap the 'three dots' button.

Step 4. Tap 'Block User' and then confirm.

Step 5. If you wish to then unblock them, while you're still on their page, tap the 'three dots' button again, and this time tap 'Unblock User' and confirm.


-> Download Instagram from the iOS App Store


Got an iOS or MacOS question that you want answered? Follow and tweet me on Twitter and your question just might get answered on this site! And maybe on Twitter, too.  


'Pok�mon GO' Eevee Name Evolution Easter Egg Trick


How to evolve Eevee in iOS and Android game 'Pok�mon GO' to the evolution of your choice.

The trick: Rename Eevee to "Sparky" for Jolteon, "Rainer" for Vaporeon, and "Pyro" for Flareon.
Note: some players have reported that this trick will only work once for each evolution!

For more iOS tips, tricks & tutorials, subscribe to the Apps Reviewed YouTube Channel! Thanks!

Find Pok�mon in 'Pok�mon GO' With This Realtime Map App


If you've been hunting for Pok�mon in the real world with the new hugely popular app, 'Pok�mon GO' for iOS and Android, you'll know how frustrating it can be to locate the nearby ones around you.
Referred by some as the 'three step bug', sometimes Pok�mon are shown on the nearby map, that simply aren't even there. 

Thanks to Pok�mon GO's API, there are now websites and apps that can help you find the exact locations of the little Pocket Monsters! 

Available on iOS and Android, PokeWhere by Vylar will become your must have Pok�mon GO companion app.

"PokeWhere is a Pokemon finder for the mobile game Pokemon Go that uses the most advanced API to give you the most accurate real time info about the Pokemon near you. The real time info is then displayed to you on the map with the exact locations of the Pokemon that have spawned near you. With PokeWhere you will never miss a beat and catch all the Pokemons.
PokeWhere is very simple to use all you have to do is press the my location button, which will bring you to where you are on the map and the Pokemons around you will show up, that's all. It will refresh as you walk. Now all you have to do now is start catching them all, it is as simple as that!" 

This app does work! It's NOT some user submitted app and because PokeWhere is in real-time, you'll know that the Pok�mon are actually there to be caught! You can even move the map around, re-pin, and do some location scouting. 

While this app is a must have for all Pok�mon Trainers, unfortunately it doesn't have the ability to search for particular Pok�mon and show you there closest location. That would be a great useful feature that hopefully someone can create. But in the meantime, download PokeWhere and find the Pok�mon near you! 

> PokeWhere is FREE to download - available for iPhone and Android phones. 

UPDATE: The company behind the game, Niantic, has disabled the ability for these live radar trackers to work. Unfortunately this app and others alike, do not work anymore.  


Got an iOS or MacOS question that you want answered? Follow and tweet me on Twitter and your question just might get answered on this site! And maybe on Twitter, too.  


How To Evolve Pokemon in 'Pokemon GO' on iOS and Android


To evolve a Pokemon in 'Pokemon Go' you need a certain amount of 'Candy' for that particular Pokemon. You can obtain more candy by catching the same Pokemon (or one of its other evolutions) multiple times. When you have enough candy, tap the "evolve" button. 


Opera Browser Adds Free VPN Service

The Opera Browser has added a free VPN (virtual private network) service, built directly into their web browser.

Currently available on the Opera Developer Build, the VPN service provided by SurfEasy Inc. creates an encrypted tunnel from the users computer directly to the VPN server at the switch of a button. 

A VPN service is also used to shield a users real IP address allowing them to bypass firewalls, enhance privacy on public Wi-Fi, and access blocked content. Eg: region blocked content. 

Opera's free VPN can currently change your IP address's location to mimic either Canada, Germany, or the United States. 


How to Enable Free VPN Service in Opera Browser (Developer Build): 

1. Download and install the Opera Browser Developer Build. Then open the browser, if it doesn't automatically open. 

2. Click "Opera Developer" in the Mac Menu bar, and then click "Preferences."

3. Under the VPN heading, check on "Enable VPN". 

4. Now open a new tab and navigate to a website.     

5. In the address bar, click the VPN button, then switch it to on. Then select the country you wish to mimic the geo-location of. 


You can read more about the Opera Browser and the addition of the VPN service, on their blog


How To Password Protect Notes in iOS 9.3 on iPhone or iPad

A new feature in iOS 9.3 is the ability to password protect your Notes. This password is not linked to your iOS passcode that you use to unlock your device, however you could always use the same pin I guess, if you're worried about forgetting the password. The password you set will be the same for all notes that you choose to lock. 

How To Password Protect Notes in iOS 9.3:

1. Open the Notes app. 

2. Create a new note, or find an existing one. 


3. Now, on the note you wish to lock, tap the Share button.

4. Now tap, "Lock Note."


5. Enter a password and choose whether or not to also allow Touch ID to unlock, and tap "Done". Important! if you forget the password - you will lose access to the note! 


6.  Now tap the lock symbol to lock the note. One thing to keep in mind is, the notes heading or first line will still be visible. 

7. To view a locked note, tap the note, then "View Note", and unlock.


8. To Remove a lock, tap the Share button, then "Remove Lock". 


How To Reset Your Notes Password in iOS 9.3:

1. Open Settings app.  

2. Tap "Notes."

3. Tap "Password".

4. If you remember the previous password, you can choose to "Change Password" or you can choose, "Reset Password". *Note: you can reset the password, however previous locked notes will remain locked with the previous password. 

5. To reset or remove password from future notes, tap "Reset Password." 

6. Enter you devices passcode. 

7. Confirm Reset.

8. If you don't want to set a new password, simple press "Cancel" on the 'Set Password' screen.


How To Stop iOS OTA Update Once Started on iPhone or iPad

If you start an iOS over-the-air update, that is, a update straight from your iPhone or iPad, from Settings > Software Update, and then need to stop the update before it's done downloading - follow these steps: 

1. Open "Settings" app.  

2. Tap "General." 


3. Tap "Storage & iCloud Usage." 


4. Under Storage heading, tap "Manage Storage."  


5. A list will populate. Find "iOS X.X" on the list, and tap on it. 


6. Now, tap "Delete Update", then again on the pop-up menu to confirm. 

7. To re-download the update, go back to Settings > General > Software Update.    


Best Ad-blocking Extension for Google Chrome or Firefox


Ads are annoying. Everyone hates them and for good reason. A lot of websites mistreat ads, they place them everywhere, they are intrusive, and often flashing, and telling you that you've won a price that you really haven't. And ads can even contain malware! There has been many cases where adware (or worse) has snuck into advertisement, even on major websites.  

Many people know of AdBlock Plus, but there's another great extension that may be even better!

uBlock Origin (unrelated to ublock.org) by gorhill; the founder and original author of uBlock, is a efficient ad blocker that is easy on your computers CPU and memory resources.

With all ready over 3 million users on Google Chrome, uBlock Origin is easy to use and comes pre-packed with the best filters including: EasyList, Peter Lowe�s Ad server list, EasyPrivacy and known Malware domains.

When compared to ABP, you can view a efficiency comparison, here.

uBlock Origin is free and open source with public license (GPLv3).

Wanna know more about uBlock Origin? Check out this podcast with security expert, Steve Gibson from TWiT.TV (about 1:21:50 into episode).


> View and Download uBlock Origin for Google Chrome

> View and Download uBlock Origin for Mozilla Firefox


Twitter Switches On New 'Best Tweets First' Algorithmic Timeline

Twitter Logo.
When it was announced, there was a out-roar from angry Twitter users who claimed that the new algorithmic timeline would be the end of Twitter. At first, the option was launch as an opt-in feature - but now, it seems that Twitter has switched on the new "best Tweets first" timeline for all users.

'Best Tweets first', is the Tweets that Twitter believes that you will care about the most and would likely engage with. When you login or open the app, these 'best Tweets' will be shown at the top of your timeline feed regardless of when they were posted.

For more detailed information about Twitter's timeline, click here.


How To Switch Off The New "Show me the best Tweets first" Algorithmic Timeline:

on iOS:

1. On your profile tab, tap the settings gear icon and select "Settings."

2. Select the account you want to change.

3. Under Timeline, tap "Timeline personalization."

4. Switch off "Show me the best Tweets first".


On Desktop / Laptop:

1. On the Twitter navigation bar, click your profile image, then select "Settings."

2. On The Account Settings page, scroll down to the Timeline under the Content heading.

3. Uncheck, "Show me the best Tweets first", then click "Save changes" and re-enter your password.


How To Preview Links In Safari Without Opening A New Tab

Ever wanted to preview a link without actually opening a new tab? Well there is actually this very feature built into Apple's Safari web browser on OS X El Capitan, that you probably didn't know existed!  

To load a weblink in a preview window, all Mac users need to do in Safari is simply use a Three Finger Tap on the hyperlink (without actually clicking down on the trackpad).


To get this feature to work, you may first need to switch on a feature in System Preferences. 

Open System Preferences, then click Trackpad and then on the Point & Click tab, switch on the feature "Look up & data detectors". 


Instagram Rolling Out Multiple Account Option


Instagram is finally adding the option to easily switch between and manage multiple accounts from within the app. This is handy for those who have a private and public profile, or for people who also manage an account for their business.

The multiple account feature is slowly rolling out to users, so if you don't have it yet, don't worry, you'll get access to its soon! In the meantime, make sure you have updated to the latest version of the app, from the App Store.

To see if you have the multiple account feature, and to add new accounts:

1. Open the Instagram app.

2. Tap on your profile (the last tab button on the bottom right).

3. Then tap the settings gear in the top right hand corner.

4. Scroll right down to the bottom and between clear history and log out will be a new option that says "Add Account".

5. Tap "Add Account" then login with the new Instagram account. You can add multiple accounts.

6. To switch between accounts, on your profile, at the top next to your username will be a downwards facing arrow. Tap the arrow to show your added accounts. Tap on the account you want to change too.


How To Make Any Song Into A Ringtone For iPhone

You can easily turn any song on your computer into a ringtone for your iPhone! You can use any song you have and turn it into a ringtone.

All you need to do is: 

1. Find the song you want to make the ringtone out of. 

2. Then you'll need to create a 30 second clip. You can use music editing programs like Garage Band.

3. Save your edited file as a .AAC file. 

4. Then you'll need to rename the file extension of your edited song from .AAC to .M4R

5. Now drag and drop the file into iTunes. 

6. Plug your iPhone in, then from the ringtones section in iTunes, drag the new ringtone to your iPhone. The new file should then sync. You can find and change ringtones on your iPhone from Settings > Sounds > Ringtone


How To Solve [App Name] Can't Be Opened Because It Is From An Unidentified Developer - OS X Tip

Mac App Store icon
When trying to install a application on a Mac that you downloaded from the internet, you may run into a pop up message that says; "[App Name] can't be opened because it is from an unidentified developer." This is a security feature of OS X to prevent unwanted and possible malware software from installing onto your computer. 

It is always best to just download software from the Mac App Store or from identified developers. However, there is some occasions where you may want to install an application that isn't from the Mac App Store. But remember, by switching off this security measure, you are installing the app at your own risk. So, only install apps from sources and developers that you trust!

To install an application that isn't from a identified developer or from the Mac App Store, you'll need to:

1. Open System Preferences.

2. Then click Security & Privacy.

3. Press the lock in the bottom left corner and enter your password so you can make changes.

4. Then under the heading "Allow apps downloaded from", choose the option "Anywhere".

You can now install the application. After installing the app, it'd be best to head back into Security & Privacy and changing the option back to either only Mac App Store or Mac App Store and identified developers.  


Fix Apple Watch Digital Touch Taps & Drawings Not Sending

Image credit: Apple, Inc.
The one time (in a long time) that I actually used the Digital Touch feature on the Apple Watch to send a few taps and a drawing and the other person didn't receive any of them. Thanks Apple. It can be so frustrating when a feature of a device doesn't work how it should. There does seem to be a simple fix that should work for many - however - what good is that really?! Because you won't know that your device is failing until someone tells you. Anyway, if you have noticed that your Apple Watch Digital taps and drawing haven't seemed to be sending, try this quick fix:

Open the 'Settings' app on your iPhone > then scroll down to and tap 'Messages' > then toggle off 'iMessage' > then switch 'iMessage' back on (after a few seconds). The re-activation of iMessage seems to fix the problem and then may even send all your recent failed digital touch messages through.

Apple Releases iOS 9.2 Update With Improvements & Bug Fixes

Apple has today released iOS 9.2 update for iPhone's, iPad's... Included in this update is various improvements and bug fixes including: improvements for Apple Music, a new Top Stories in News, and Mail Drop in Mail for large attachments. 

Before updating, remember to backup your iOS device to iTunes or at least iCloud! Then you can update over-the-air on Wi-Fi by going to: Setting > General > Software Update on your iOS device. Or you can also update through iTunes with your device connected to your computer.   

How To Switch On or Off 'Low Power Mode' - iOS 9 iPhone Tips


If your iPhone's battery is running low, thanks to a new feature added in iOS 9 called, Low Power Mode, you might just be able to get by until you can find a charger.

When activated, Low Power Mode, helps your iPhone save some battery life by switching off features like; mail fetch, background app refresh, automatic downloads, and some visual effects.

Low Power Mode, when on, is indicated on your iOS home screen by the battery icon appearing as yellow.

You can manually switch on Low Power Mode, or switch it on when prompted by your iPhone when your battery runs down to twenty percent.

To switch on Low Power Mode, open Settings, tap Battery, then toggle on "Low Power Mode". Low Power Mode will automatically switch it's self off when your charge your iPhone back up, or you can toggle the option off from the same setting.

If activated, Low Power Mode could give your iPhone up to an extra three hours of battery life.


How to Load Website without Content Blockers in iOS 9


Installed a Content Blocker and noticed a website doesn't seem to be working correctly? Content Blockers usually load most sites fine - but as they are 'Content Blockers', some things on the site will be missing - mostly, ads. Content Blockers could break a website.

Luckily, there is a quick way to disable Content Blockers and reload the webpage. To do this, hold down the Reload button in Safari, then two options will appear: "Request Desktop Site" and "Reload Without Content Blockers". Tap the latter to reload the webpage in its entirety.

> Learn how to set up Content Blockers in iOS 9 for iPhone and iPad.


How To Transfer Videos To or From Your Mac To Your iPhone or iPad

Got videos on your Mac that you want to transfer to your iPhone? Or videos from your iPhone (or iPad) that you want to transfer to your Mac? It's actually very simple to do.

You could connect your iOS device via the Lightning Cable to your Mac computer and use iTunes or Apple's Photos app, but an even better and easier (cordless) way is to use AirDrop.  

To transfer videos via AirDrop and use them on the built-in iOS Photos app  -  you'll need the videos to be .mov, .mp4 or .m4v files.  If you are unsure what file type your video is, on your Mac, check the end of the file name or if it doesn't show, Control + Click and select Get Info. Anything that writes H.264, MPEG-4 or QuickTime should be fine.  

First, make sure you have AirDrop switched on: On iOS, slide up the Control Center panel, tap AirDrop and select either Everyone or Contacts Only (if you have your contact info added). On Mac, open Finder, tap AirDrop on the sidebar, then click "Allow me to be discovered by:" and select again, Everyone or Contacts Only. 

From Mac to iPhone or iPad, all your need to do is select and drag the file in Finder, hover over AirDrop - wait for AirDrop to find your iOS device and then hover-over and release and accept the file transfer on your iOS device, if prompted. 

From iPhone/iPad to Mac, find and select the video in your Camera Roll. Tap the Share button (square with up-pointing arrow) - and wait for your Mac device to be found and show in the AirDrop section - then tap your device and wait for the file to transfer.


Download Free iOS Apps Without Having To Enter Your Password - iOS 9 Tip


Isn't annoying when you are trying to download an app for your iPhone or iPad from the App Store and you get prompted to enter your password?! Well, did you know you can actually switch off this requirement for free app downloads?! But there is a small catch. To make this option show, you have to switch off 'Use Touch ID for iTunes & App Store'. So it's convenient if you are downloading mostly free apps.

How to download free apps without needing to enter your password on the iOS App Store:

1. Open 'Settings'.

2. Tap 'Touch ID & Passcode'.

3. Under the heading 'Use Touch ID For', switch off 'iTunes & App Store'.

4. Now back to Settings, tap, 'iTunes & App Store'.

5. Then tap 'Password Settings'.

6. Now, under the heading 'Free Downloads', switch off 'Require Password'.


Featured Post

How To Update Your iPhone and iPad to iOS 10

iOS 10 is here! Here is how to update your device and get all those new features!  The first things you'll want to do before upda...